
When you have tools as useful as Views and Panels 3, you'll want to be able to use them together. To figure out how to use them together, let's create a new front page. Drupal's standard front page is useful, but we want something a little more. Please note that the screenshots are from Panels 2, but are similar to Panels 3.
- The first thing to do is make sure you have both Views and Panels 3 installed. You don't need all of the Panels modules, but it's easiest to enable them all at once.
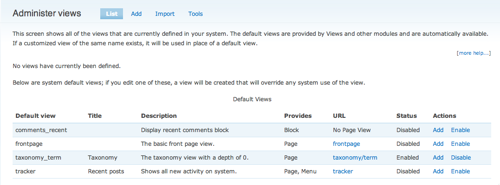
- The next step is to create the views we'll need. The first one we need, the front page view, is a sample view that comes with Views. Let's enable that.
- Click Views (Site Building > Views). This brings you to the Views management page. On the bottom, under the 'Default Views' heading, find the 'frontpage' default view, and click 'Add'. Note that this screenshot is for Views 1; the Views 2 screen is different, but the frontpage view is still available.
- Click 'Save' at the bottom.
- Views 2 has an 'archive' view provided by default. Simply enable it.
- Click 'Save' at the bottom.
- Now, on to the panel. Before we can create the panel, you need to make sure Panels can "see" the content you've created. Click the 'Settings' tab at the top. (Administer > Site Building > Panels > Settings > Panel pages)
- Make sure everything under the 'New content behavior' heading is checked, especially the checkboxes next to 'New All Views' and 'New Views Panes
- Save.
- Now, to create the panel. Click Panel pages (Administer > Site Building > Panels > Panel Page).
- Set the Name to: front_page
- Set the Administrative title to: Home
- Set the Path to: front (Alternately, you can check the "Make this your home site page" checkbox.)

- Click 'Continue' at the bottom.
- Let's select the 'Flexible' layout, which allows us to create our own layout.
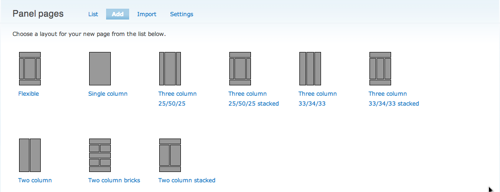
- Click Continue.
- The 'Layout settings' tab that you are brought to looks intimidating, but we're just making a couple changes. One of the benefits of selecting a flexible layout is being able to easily manipulate your panel to have any kind of configuration.
- Now, we want some custom dimensions for the panel, so we'll need to invole the Layout designer. Click the "Show Layout designer" button.
- In the Region menu, select Region settings, and change the region title to "Left".
- Move up a 'box' to the row. In the Row menu, select "Add region to right". Title this region "Right".
- Use the slider bar to set the width to 80 on the left, 20 on the right.
- Click Finish.
- Now we need to add a menu item. Click the 'Menu' tab on the left.
- Click the checkbox next to 'Normal menu entry'.
- Set the Weight to: -10 and the Title to 'Home'.
- Click 'Update' at the bottom.
- Click the 'Content' tab on the left.
- Click the gear icon in the left pane.
- Under the 'Views' heading, find and select the 'frontpage' view we added earlier.
- Select the display you wish to use (try page if it's available.)
- Click Continue.
- Click the checkbox next to 'Link title to view'.
- Click the checkbox next to 'Provide a "more" link that links to the view'.
- Click 'Finish' at the bottom.
- Click the gear icon in the right pane.
- Under the 'Activity' heading, find and select 'Who's new'.
- Click 'Finish' at the bottom.
- Click the gear icon in the right pane.
- Under the 'Activity' heading, find and select 'Who's online'.
- Click 'Finish' at the bottom.
- Click the gear icon in the right pane.
- Under the 'Views' heading, find and select 'archive'. Use the block display.
- lick Continue
- Click the checkbox next to 'Link title to view'.
- Click 'Finish' at the bottom.
- Click the gear icon in the right pane.
- Under the 'Activity' heading, find and select 'Recent comments'.
- Click 'Finish' at the bottom.
- Click 'Save' at the bottom.

- Now, one last thing to do; we still have to make our front page the front page. Go to the 'Site information' menu (Administer > Site configuration > Site information).
- Set the Default front page to: front
- Click 'Save configuration' at the bottom.
- Click the 'Home' menu item we added on the menu.
- Voila, we have overriden the front page with a panel!


0 comments:
Post a Comment